Power Automate and React Integration: Automate Business Processes
Discover the Power of the Power Platform and how Power Automate can be integrated into traditional development using React JS.


Table of contents
Introduction
Are you curious about the rising trend of citizen developers and their collaboration with professional developers to streamline business processes? Discover how the Microsoft Power Platform empowers both developers to work hand in hand as we walk you through building a registration form with React, integrating it with Power Automate, and leveraging Excel as a data storage solution.
Imagine an organization instructing its software engineers to build a registration landing page for an event, the data must be stored in an Excel file. Also, imagine in that same organization there is a low-code developer. How can these two developers work together on this project?
This is where the citizen developer and the pro developer can work together to execute this project.
I first saw a demo of a web app like this in ASP.NET Core during the Global Power Platform Bootcamp 2023, in Accra, Ghana by Frank Odoom a Microsoft MVP. So, I decided to replicate it in a JavaScript library I'm familiar with.
In this article, I will walk you through how to build a registration form with React that sends data through an API to Power Automate and then saves the data in an Excel file. We won't just save the form data in Excel but also send out an email to the user, this is to make sure that the email address is valid else it won't be saved in file Excel which is acting as our data storage.
Getting Started
To start building this project, we first need our API. How can we get the API to use in our source code in React? Let me first list the steps I went through to fully build this project.
Set up the Power Automate workflow to handle API data.
Test the API using Postman to ensure successful data transmission.
Create a React app and build the registration form.
Utilize Axios for making HTTP requests from the React app.
Implement React Hook Form for form validation and handling.
Use React Router for seamless navigation, including a success page.
Create the Success page.
Deploy the React app to make it accessible online.
Build the Power Automate Workflow
If you are new to Power Automate, you will need a Microsoft 365 license to be able to use the Power Platform. Create your Microsoft 365 developer tenant here. If you're unsure how to get started you can see this post with more details on how to set up Microsoft 365 Developer Account.
Step 1:
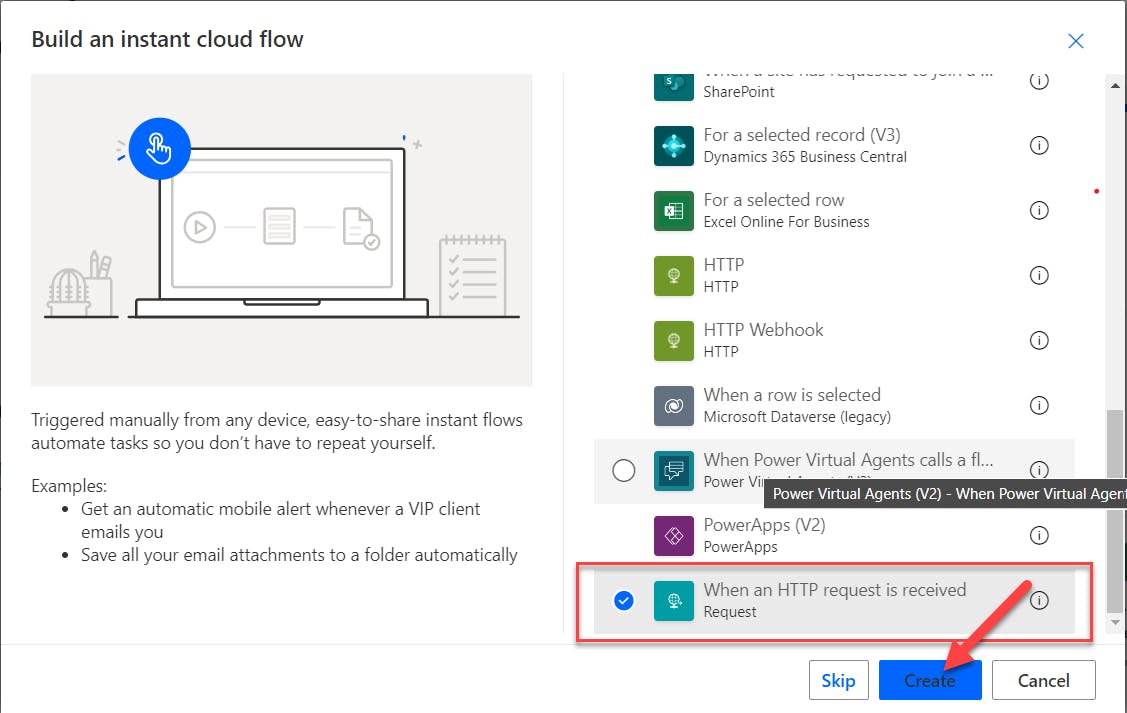
To start with, we first need to know which type of Power Automate flow to use. Understanding the flow type will help you know the trigger connector to use. For this flow, we shall use the Instant cloud flow.

From the figure below, give your flow a name, then select the connector “When an HTTP request is received”. Proceed to create your flow, by selecting the Create button.
Step 2:
After selecting the create button, you will be directed to your flow. You will see the trigger connector when you first created it. In the connector, you will need to generate the JSON payload.
A JSON payload refers to the data that is sent or received in JSON format as part of a request or response in a web application or API. Power Automate has made it very simple for us to just write a sample payload and then use the feature in the connector to generate schema.
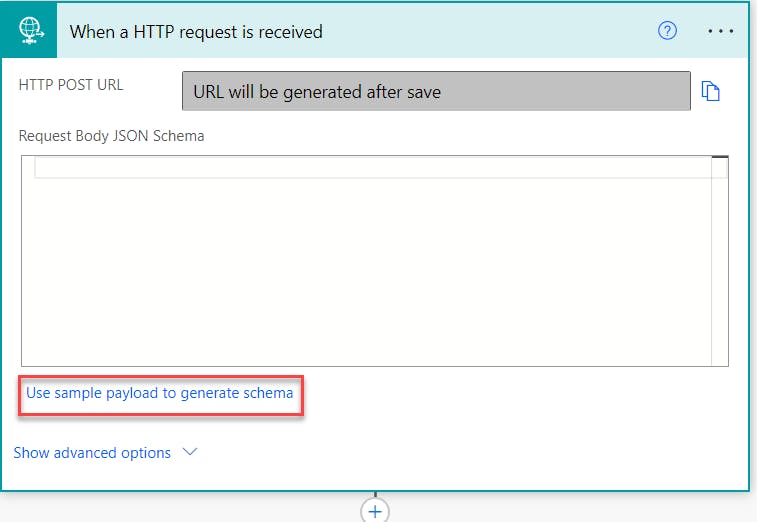
Click on the “Use sample payload to generate schema”.
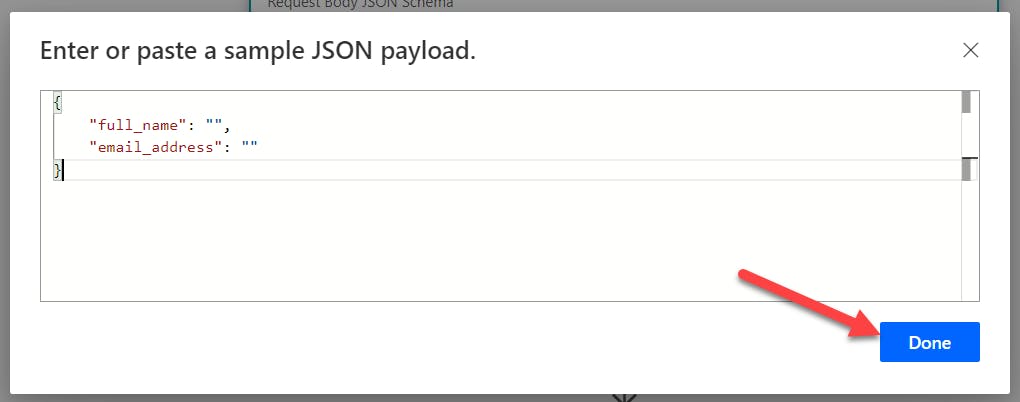
After writing your sample payload, click on "Done" to generate the schema.
Click to show the advanced options, in the method dropdown menu, choose POST as the HTTP verb. We are going to make a POST request.
Step 3:
Search for the connector, “Parse JSON” and select it.
Select the on the Content input, to add “Body” as the dynamic content.
At the schema input, just copy the JSON payload generated in the trigger connector.
You should have something like this.

Step 4:
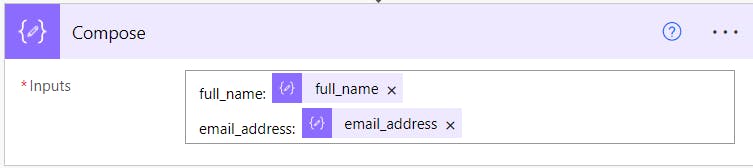
Select the “Compose” connect and parse the JSON variables generated in the “Parse JSON” connector above, as dynamic content in the “Compose” connector.
You should have something like this.
Step 5:
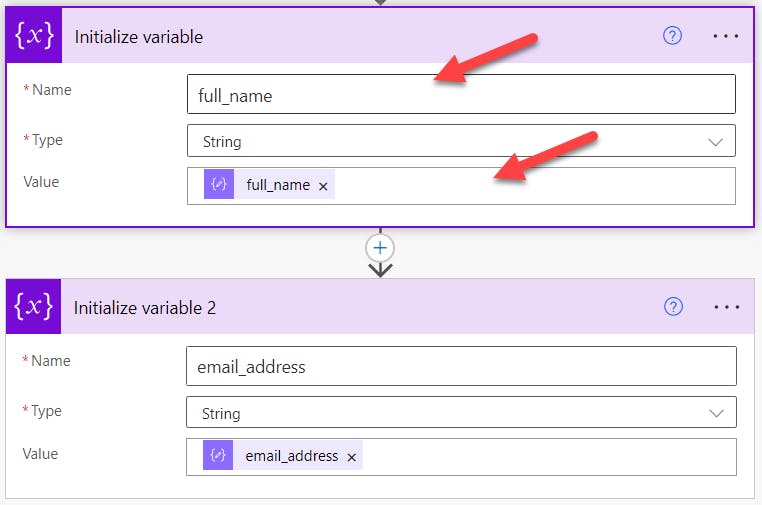
In this step, we have to initialize the data received to a variable. So search for “Variable” and Select it to show the connectors. Choose the “Initialize Variable” connector.
Give the variables a name and initialize, select “String” as the data type for both variables “full_name" and "email_address”. Remember that in the JSON payload schema, the data types are both strings.
Step 6:
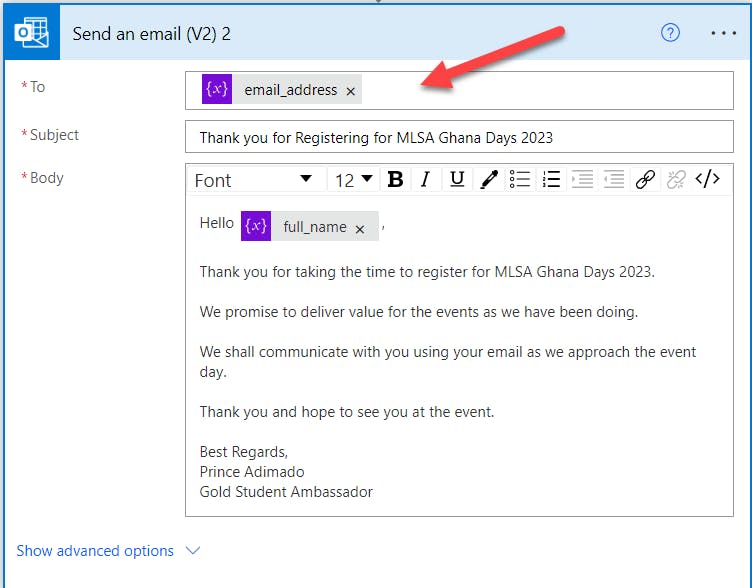
In this step, we proceed to craft our email message. Search for Outlook and choose the “Send an email (V2)” connector. We will use this connector to send an email once the form is submitted.
Craft your email message, this is how I wrote mine.
Step 7:
We shall use Excel for data storage when the form is submitted. You first go to your OneDrive and create an Excel online file. It will be ideal to create a folder where you can be able to reference this easily. As I did for Outlook in the previous step, search for Excel and choose “Excel Online (Business)”. From the list of Excel connectors, choose the “Add a row into table” connector.
Test the API using Postman to ensure successful data transmission.
Now we are done building our flow, the next step is to test whether our flow works. We don’t need to finish building the UI with React to be able to test our flow.
Create a Postman account if you don’t have one. We will use Postman to make a POST request to the HTTP POST URL or the API.
To get the API URL, go to the trigger connector to copy the URL.
Note: that you will need to save your flow for the HTTP POST URL to be generated.
Follow this guide to test your flow.
Create a React app and build the registration form.
This is where we build the UI of the registration form using React.
To follow along, I used Tailwind CSS as the framework for styling, and also we will use Vite as our development server and a build tool that focuses on fast development experiences.
To create a Vite project, run this command:
npm create vite@latest my-project -- --template react
cd my-project
Install Tailwind CSS, run these commands
$ npm install -D tailwindcss postcss autoprefixer
$ npx tailwindcss init -p
Finally, run this command:
npm install
Follow this guide on the Tailwind CSS website to finish the setup-up of your project.
Now, let’s proceed to build the form. Since this is a guide, I won’t be giving details on how I style the form. But I will show I applied React Hook Form, Axios, and React Router to achieve the functionality of the web app.
import { useEffect } from 'react'
import { useForm } from "react-hook-form";

export default function App() {


return (
    <div className="App font-serif bg-gray-300 min-h-screen">
      <div className="flex justify-center items-center py-[5rem] sm-425:py-0 ">
        <div className="max-w-[30rem]  ">
          <div className="flex flex-col bg-[#fff] w-full rounded-md px-5 py-12 sm-425:pt-16 sm-425:min-h-screen sm-375:min-h-screen sm-375:pt-16 sm-320:min-h-screen sm-320:pt-12">
            <div className="description mb-5">
              <div>
                <img
                  src={badge}
                  alt="mlsa logo"
                  className="w-20 h-20 mx-auto"
                />
              </div>
              <h1 className="text-black text-2xl font-semibold text-center py-3 sm-320:text-center sm-425:text-center sm-375:text-center">MLSA Ghana Days 2023 </h1>
              <p className="font-medium text-sm text-justify ">MLSA Ghana Days is a 3-day event that brings together students,
                developers, and tech enthusiasts to learn, network, and share ideas on the latest
                 technologies from Microsoft.
              </p>
              <h2 className="mt-3 text-lg font-semibold">Register here</h2>
            </div>

            <div className="">
              <form action="#" onSubmit={handleSubmit(onSubmit)}>
                <div className="form__group flex flex-col mb-5">
                  <label htmlFor="name">Full Name</label>
                  {watchAllFields && <input
                    type="text"
                    id="name"
                    placeholder="Enter your full name"
                    className="border-2 outline-none border-gray-400 focus:ring-1 focus:ring-amber-500 rounded-md p-2"
                    {...register("full_name", { required: true, maxLength: 70 })}
                    aria-invalid={errors.full_name ? "true" : "false"}
                  />}
                  { errors.full_name?.type === "required" && ( <span role='alert' className="text-red-500 text-sm">This field is required</span> )}

                </div>
                <div className="form__group flex flex-col mb-5">
                  <label htmlFor="email">Email Address</label>
                  { watchAllFields && <input
                    type="email"
                    id="email"
                    placeholder="Enter your address"
                    className="border-2 outline-none border-gray-400 focus:ring-1 focus:ring-amber-500 rounded-md p-2"
                    {...register("email", { required: true, pattern: /^\S+@\S+$/ })}
                    aria-invalid={errors.email ? "true" : "false"}
                  /> }
                  { errors.email?.type === "required" && ( <span role='alert' className="text-red-500 text-sm">This field is required</span> )}
                </div>
                <div className="form__group ">
                  <input
                    type="submit"
                    value="Submit"
                    className="bg-amber-500 w-full text-white font-semibold py-2 px-4 rounded-md cursor-pointer hover:bg-amber-600 active:bg-amber-700 focus:outline-none focus:ring-1 focus:ring-amber-500"
                  />
                </div>
              </form>
            </div>

          </div>

        </div>
      </div>
    </div>
  )
}
In the above code represents a React Component that renders a registration form for an event called MLSA Ghana Days 2023. The form includes 2 fields, and these fields are the same as the JSON payload in the Power Automate flow. The form includes fields for the user’s full name and email address, along with a submit button. It utilizes React Hook form for form validation and handling. When the form is submitted, the onSubmit function is called. Finally, the form is styled by Tailwind CSS classes and made responsive.
Utilize Axios for making HTTP requests from the React app.
import { useEffect } from 'react'
import { useForm } from "react-hook-form";
import axios from 'axios';
import { useNavigate } from 'react-router-dom';


export default function App() {

  const { register, handleSubmit, watch, getValues, reset, formState: { errors } } = useForm();

  const watchAllFields = watch();

  const navigate = useNavigate();

  const onSubmit = async () => {

      try {
        const formdata = getValues()
        const {full_name, email} = formdata;

        const response = await axios.post("/api",
         {
          "full_name": full_name,
          "email": email
         });

         console.log('Response:', response)
         reset();

         // Redirect to Success message
         navigate('/success')
      } catch (error) {
        console.log('Error:', error)
      }
  }

  useEffect(() => {
   const subscription =  watch((value, {name, type}) => console.log(value, name, type));
    return () => subscription.unsubscribe();
  }, [watch]);

return (
// JSX code for the form below

)
}
The provided code snippet showcases the functionality of a registration form implemented in a React application. Here's an overview of its functionality:
The
useFormhook from the React Hook Form library is utilized to handle form registration, submission, and validation. It provides methods likeregister,handleSubmit, andwatch, as well as access to form state and validation errors.The
watchfunction is used to monitor changes in form fields and store the values in thewatchAllFieldsvariable.The
useNavigatehook from React Router is used to enable programmatic navigation. It allows for redirection to a success page after form submission.The
onSubmitfunction is called when the form is submitted. It retrieves the form data usinggetValuesa component from React Hook Form and makes a POST request to the/apiendpoint, sending thefull_nameandemailvalues in the request body.
Note: The /api is the HTTP POST URL you copied in Power Automate to test the flow. Copy the API URL and paste it, to allow Axios to make the request.
If the request is successful, the
resetfunction is called to clear the form fields, and the user is redirected to the success page using thenavigatefunction.If there is an error during the submission process, the error is logged to the console.
The
useEffecthook is used to subscribe to changes in form field values usingwatch. Whenever a change occurs, a callback function is triggered to log the updated value, field name, and field type. The subscription is unsubscribed when the component is unmounted.
In your main.jsx, create a route using CreateBrowserRouter. This will handle the navigation between the two pages.
import ReactDOM from 'react-dom/client'
import App from './App.jsx'
import Success from "./component/Success.jsx"
import {
  createBrowserRouter,
  RouterProvider,
} from "react-router-dom";

const router = createBrowserRouter([
  {
    path: "/",
    element: <App />,
  },

  {
    path: "/success",
    element: <Success />,
  }

])

ReactDOM.createRoot(document.getElementById('root')).render(
  <RouterProvider router={router} />
)
Well, we are almost done. Let’s proceed to create the success page, this page as mentioned above, after form submission useNavigate will route from the home page to this success page.
import check from "../assets/check.png";

export default function Success() {

    return (
        <div className="success font-serif bg-gray-300 min-h-screen">
            <div className="flex justify-center items-center py-[10rem] sm-425:py-0 sm-375:py-0 sm-320:py-0">
                <div className="max-w-[30rem] bg-white rounded-xl shadow-2xl sm-425:min-h-screen sm-425:rounded-none">
                    <div className="">
                        <div className="description px-5 py-5 sm-425:py-[10rem] sm-375:py-[10rem] sm-320:py-[10rem]">
                            <div className="flex flex-col ">
                                <img
                                    src={check}
                                    alt=" success check icon"
                                    className="w-20 h-20 mx-auto"
                                 />
                                <h1 className="text-black text-2xl text-center font-semibold py-3">
                                    Thank you for registering for MLSA Ghana Days 2023
                                </h1>
                            </div>
                           <h2 className="font-medium text-base text-center mt-2 text-gray-600">Kindly check your email for a confirmational message.</h2>
                        </div>
                    </div>
                </div>

            </div>
        </div>
    )
}
The success page only contains styling for the page and does not include any functionality but just displays the page.
Now we are done, but you must test your application to make sure it works and after form submission, it saves the data to Excel. I will include a demo video here to show you how my version of the web app functions and looks.
Conclusion
In conclusion, we have embarked on an exciting journey of building a registration form with React, harnessing the power of Power Automate. By leveraging the capabilities of React Hook Form and Axios, we have achieved seamless form validation and submission.
The integration of Power Automate and React has demonstrated how low-code solutions can complement traditional software development, enabling us to create robust applications with ease.
I hope this guide has inspired you to explore the endless possibilities of integrating drag-and-drop tools like the Power Platform into your development projects, we are only limited by our imagination by the extensibility of the Power Platform.
You can find the link to the GitHub repository of the source code here.
Feel free to share your feedback and connect with me on LinkedIn and Twitter. Let's continue innovating together!